this Web page last updated Oct 2 2006.
This is a work in progress during 2005 and 2006, on an 8-inch f/5.5 mirror cut from a sheet of Pyrex. To see what I did from that flat blank to grinding and polishing and figuring to a f/5.5 parabola (finished by Gordon Waite), see my "myglass" Web page describing all the details. On this page I'll discuss figuring the mirror BACK to a sphere, and then figuring the parabola myself, as I work the resulting zones. But as I ended up with a mirror with zones and roughness, I took it BACK AGAIN to a sphere and (with help) to the parabola to finish it, as this subsequent Web page describes it.
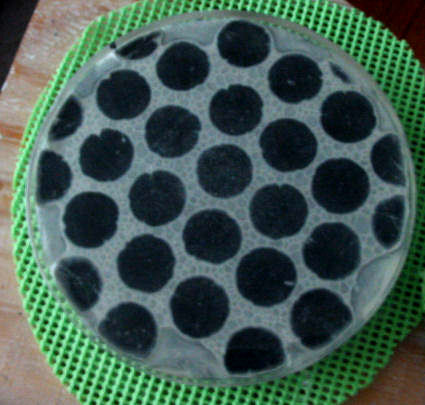
Preparing the pitch tool: screen microfaceting
Reading the Couder mask
Stroke strategy from the data
Final surface issues
Herb's review: Fixing zones
Corrective work: a response from Gordon Waite
The mirror is an 8in at radius R=89.19, zones radaii 1.789, 2.530, 3.098, 3.578, 4.0.
The desired deltas on measuring the zones (in mills) are:
--
22
18
18
delta 76.
I took a flat glass blank, to grinding and polishing, to spherizing; Gordon Waite figured it to a f/5.5 parabola See that history on my "myglass" Web page which describes all the details. Why didn't I leave it at a parabola? Because Gordon Waite only did it to show me it COULD be.
On April 10, Gordon showed me how he could take the mirror to a parabola from my sorry state, as a demonstration. Gordon prepared the pitch tool and then moved it to a rotating table. Then Gordon did several minutes of various 1 to 2 minute sets of a particular stroke, mirror on top, asking me to call out the time for each set. Sometimes he did a few minutes of the center-over-center stroke; sometimes a minute, or 1.5 minutes, of an offset stroke. Some of his center work was with a LOT of pressure: the mirror was noticably warmer to the touch afterward. He finished up by spraying down the tool in place with water from a squirt bottle, and then a few minutes' work using the .1 micron fine Cerox.
Results: While the center is relatively flat as shown by the shadowgrams, and it still has some surface irregularities, "it's better than most commercial 1/4-wave mirrors". Given the margin of measurement error, the mirror has a 90% probability of 1/6th wave.
test3	delta
062	-
074	12
092	18
115	23
133	18
delta =71	curve is 1/8.2 wave
As mentioned above, my goal is to spherize the mirror, and then reestablish the parabola.
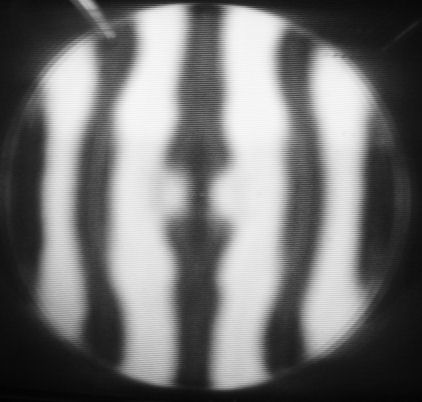
April 24, 11:45PM: The center of the lap made poor contact; I could see an air bubble over the center pitch pad. I shaved off the edges of the facets around the tool, and cold scrubbed it. A warm press revealed better contact. I did three rounds of 5 to 6 minutes each, twice around the table. I pressed harder and was deliberately sloppy with my strokes: longer or shorter, no W to 1.5-inch wide. I added Cerox to keep the tool wet. The last half-minute I did some figure-8's to get a feel for the surface. Here's the later Foucaultgram and the later Ronchigram. The numbers are:
251	-
223	-28
219	-4
234	15
270	26	delta 19
min to max 51
Gordon again said there was a good diffraction ring. The surface was noticably smoother, and the figure was a little oblate but the center was now flatter and a hill rather than a bellybutton. He suggested another 10-15 minutes more of work may get it to a sphere. I asked about the stroke strategy, and he made numerous suggestions, which are detailed in my notes on figuring strategy below. By interpreting the Ronchi bars and the Foucault mask values, they suggest a strategy of specific sets of strokes to affect specific zones. Specifically, some short strokes of about 3/4 inch for the bent Ronchi bars; alternating with some long strokes to further flatten out the center, or with some other strokes. The bottom line however was more work, more pressure, more CONSISTENTLY varied strokes for next time.
may 08:I'm continuing to bring the mirror back to a sphere and with a better (no dog-bisquit) surface.
7:45PM Brass-scrub tool, warmpress for 5.5 minutes w/20 lbs, cold for 6 minutes. Alternate minutes between 1/3 COC stroke and 1-1/2" short stroke - six minutes total, four times around the 'barrel'. Room temp a little cool, mid 60's F? Another cold press for 6 minutes, another six minutes of same prescription. Here's the first Foucaultgram and the first Ronchigram. At 8:45PM the numbers were:
695	-
667	-32
654	-13
666	12
698	32	delta +3
min to max 44
A little bit of a hole, getting a bad turned down edge at the outer inch or so. But still a diffraction ring on the edge. surface smoother but stil dogbisket-y. Prescription: 20 minutes of four or five sessions 1 to 1.5" TOTAL COC stroke (a shorter version of the 1/3 stroke) to get the edge back under control.
9PM Another warm/cold press of five minute each as previous session. Did four sessions, each around the table three times over five to six minutes, cold presses in between. Here's the resulting second Foucaultgram and the second Ronchigram. Just made simple measurements:
295 at center
248 at edge, delta 47
The result from these short strokes is typically very zony. Height of zones does not matter - they will be resolved subsequently. But the edge is good again. Prescription: two 5-minute sessions 1/3 COC with 1/2-inch W stroke.
11 PM: Warm press 8 minutes as above, Three go-arounds of the table over 5 minutes. (misread notes, did 1-inch W stroke.) Used 5 strokes per step, then four, then 5 - just for variety. Cold press, then TWO go-arounds for about 3.5 minutes, followed by 30 seconds of figure-8 stroke left and right to feel the surface; then 1 minute around the table with 1/3 COC stroke. Here's the resulting third Foucaultgram and the third Ronchigram At 11:30PM the numbers were:
253	-
223	-30
209	-14
205	-4
222	17	delta +29
min to max 44
Still a little zony, but it's flatter. Prescription: "do more of the same 1/3 COD for a few more sessions. PUT MORE PRESSURE ON. But slow and smooth is preferable to more pressure" in order to maintain or improve the surface.
Commentary: Note that the second and third zone deltas are negative for the last few sessions. To bring the mirror back to a sphere from the paraboloid or hyperboloid, the center will be low as the edges are lowered. Consequently with work the center will "rise" and the sphere will emerge as a "flat" set of measurements. Monitoring pairs of deltas like this are a way to determine progress.
June 4th:While still working to a sphere, I want to improve the surface. I'm trying a small weight on the mirror while polishing. This is a seven-pound slab of lead, about 5 inches on a side. It's in a plastic bag, and I'm using a simple pad between it and the mirror. I'll see if I can use this instead of hand and arm pressure. I'll work at home for some short sessions and test next ATM meeting.
2:45PM Room temp about 73 degrees F. Mixed 1u CerOx, 50% old mix, 50% new mix of 1 tspn CerOx, 9oz distilled water in another 9oz of old Cerox mix. Washed and brass-brushed the tool in hot water. Did not get the tool that hot. Warm press mirror for about 11 minutes with 10 lbs weight. Afterward moved mirror around on tool to make sure the CerOx was distributed: a few wriggles and all the pitch squares looked evenly colored. Added a bit more Cerox and did a cold press for one minute with 5 lbs weight.
1st session no weight this session, I want to be sure the mirror and tool are well mated. 1/3 COC with MOT, not much pressure. Went around table three times, used four strokes per position at table, 1.5 minutes to get around table, 4.5 minutes total. Recharged with a little Cerox, did not wait long for next session. Mirror did not seem to stutter but was never "silky smooth", which seems to be typical for all these sessions.
2nd session with 7-lb lead weight, otherwise same methods as previous. Went round table TWO times in about four minutes. Took photo of bubble pattern, looks like a good and uniform spread. Strokes with the weight are slower as I have to use more care and more muscle. It's likely my strokes this session were shorter than 1/3 total because of this first trial.
3rd session after about a five-minute cooldown, no weight on mirror. Then put weight back on and did another two times around the table at four strokes per position; then one time around the table at THREE strokes per position. I rotated the weight occasionally on the mirror. Total polishing time: 5.5 minutes.
3:20PM clean up, was very careful to get all the cerox off the mirror. (Normally at the ATM sessions the mirror gets dunked in a water bath to bring it to room temp for testing.) I took the Foucaultgram and the Ronchigram at the next ATM session on June 5th. The numbers for this session were:
	this
645	-
626	-19
606	-20
610	+4
630	+20	delta -15
min to max         39
Commentary: When stroking with the weight, I did not use a stiff arm stance. I had to use my forearms to move the heavier mirror and weight and to maintain control. I had no problem with the weight slipping, it was very stable. Also because of the extra mass my strokes were slower. But after looking at the Foucaultgram and Ronchigram, the mirror is just too zony.
June 5: I did these ATM sessions without weight because I thought the weight was increasing the zoning. (In retrospect as I write these posts, I'm not sure that was the case.)
9PM: Warm press 20 lbs 5 min. First session two times around the table, 6 strokes per position, longer than 1/3 COC stroke, sloppy 1-inch wide W. Time 5 minutes. Second session cold press 20 lbs 5 minutes, twice around the table, 4 strokes per position but similar otherwise, again 5 minutes. Foucaultgram and Ronchigram results. Numbers for this session were measured by me as:
	this
195	-
158	-37
142	-16
153	+11
185	+32	delta -10
min to max         53
Gordon noted the minimum to the maximum was 43, versus the previous 39. He suggested alternating between the short stroke (less than 1") for 1 min and the 1/3 COC for one minute, for about 15 minutes total - NO W-STROKING. The short stroke was necessary to address the growing turned down edge; the "normal" stroke to bring it to a sphere. See the commentary for details.
midnite: Warm press 20 lbs for 6 minutes, First session alternate one minute each of short and 1/3 stroke, four times around the table over 6.5 minutes. Second session after 8-minute cold press. Four times around the table, same strokes for 6.5 minutes. Resulting Foucaultgram and Ronchigram are shown. Numbers for this session were:
	this
241	-
220	-21
200	-20
210	+10
239	+29	delta -02
min to max         41
Gordon said "not much work done. This is very common amongst the amateurs here. You probably need maybe... three times as much pressure on the mirror to get real work done."
JUne 12th 9PM: 41 minutes total in seven sessions as follows; 5 min 1+ COC, 5 min 1" COC, 8 min 2" COC, 5 min 1"/2" COC, 5 min 1"/2" COC, 8 min 1"/2" COC, 5 min 1"/2" COC. Resulting Foucaultgram and Ronchigram at 11PM are shown. Numbers for this session were:
	this
292	-
278	-14
248	-30
232	+16
253	+21	delta -39
min to max         44
Gordon: do more edge work, use more pressure.
12 midnite: More pressure. Several minutes various bad COC strokes, followed by 5 min 1" COC strokes. Resulting Foucaultgram and Ronchigram by 12:30AM are shown. Numbers for this session were:
	this
175	-
168	-13
129	-39
110	-19
126	+16	delta -49
min to max         65
Gordon: 5 minutes effective COC work reduced the edge by 5 (from +21 to +16). So to remove 16, work 15 minutes same way.
12:55AM: 15 minutes COC 1" stroke, more pressure. Resulting Foucaultgram and Ronchigram are shown. Numbers for this session were:
	this
140	-	(note: center too bumpy to be exact)
158	+18
114	-44
099	-15
101	+02	delta -39
min to max         59
Gordon: 1) Pressure and speed of stroke did the work - see?
2) Note how smooth and flat the outer zones are.
Strategy: 1) need to remove 60 thousandths overall.
2) Since we know that a full COC stroke removes 1 thou/minute, but offset works twice or three times faster,
we can see what several minutes of an offset stroke will do.
3) Therefore, overhang the mirror on the tool, to work the interior zone #3, at 3 inches out.
An explanation and description of the offset method directed by Gordon is in my review notes in my reference section. Gordon's further explanation is also in my reference notes.
2AM: The prescription for correction strokes is several minutes of offset strokes in the zones 2 and 3. The pattern is 3 strokes offset on outside edge of zone 3, 2 strokes between zones 2 & 3, 1 stroke inside edge of zone 2; then 1-2-3 back. Mostly strayed outside zone to outer edge. After a several minute session, the resulting Ronchigram is shown. Numbers for this session were:
	this
100	-
093	-07
072	-21
056	-14
061	+05	delta -39
min to max         44
Result: Zone 3 down by 22 (44 to 21).
2:30AM: Did another session of the above, several minutes, with more control. Resulting enhanced Foucaultgram and Ronchigram are shown. Numbers for this session were:
	this
171	-
177	+06
163	-14
151	-12
154	+03	delta -17
min to max         26
Gordon: still oblate but smoother and less zony. 1/2.3 sphere or 1/4.9 parabola.
Suggestion for next round: Change the offset stroke from 3-2-1-1-2-3 to 4-2-0-2-4 for several minutes. In other words, don't work the outermost part of the zone and do more work to
9PM: Did two sessions, 6 min and 6-3/4 min, of 4-2 pattern (but no reversal to a 4-2 as previous??). 4 strokes with 1" offset, 2 strokes with 1.5" offset. Resulting enhanced Foucaultgram and Ronchigram are shown. Numbers for this session were:
	Gordon
191	-
192	+01
197	+05
192	-05
201	+09	delta +10
min to max		+10
1/8.5 sphere, 1/1 parabola
June 19th, 11:45PM Taking instruction from Texerau, the "parabolizing stroke" is a W-stroke of five strokes across the mirror, tool on bottom, from front to back. Meanwhile the mirror moves from tool right to tool left. For the forward and reverse strokes, the center of the mirror moves reaches to 4/5 the tool diameter - that's .8 inches from the edge. To DEEPEN the center, which is parabolizing, the strokes should be crowded near the left and right edge. So there is a 1-2-3-2-1 pattern, "1" short at the right edge, "2" stroke at the right middle zone, "3" a stroke in the center zone, then "2" to middle left and "1" to middle edge.
What I did was a W-stroke PLUS a W-stroke back. That's a 1-2-3-2-1-2-3-2-1. Consequently I did THREE strokes on the edge, FOUR in the middle zone, and TWO in the center. BLEAH! I did that for ten minutes, adding cerox halfway, and about two rotations around the table.
Resulting Foucaultgram and Ronchigram are shown. Numbers for this session were:
	herb #2 (and remember this was from a sphere with delta=10)
219	-
227	+08
251	+24
253	+02
268	+15	delta +49
min to max		+49
As can be seen above, I created two deep deltas; between zones 2&3, and between 4&5. And the 2&3 is deeper than the 4&5 because I did more strokes there. But remember, my goal is a parabola, with each zone something like 18 to 21 delta. Consequently, a "prescription" would be work zone 3 (to bring it "down" from zone 4) and zone 2 a bit to bring it down to zone 1). So a ratio of strokes on Zone 3 and on either side of Zone 2 seemed appropriate, as follows:
3 strokes, 1" offset for zone 3;
1 stroke, 1.5" offset, for outer edge of zone 2;
1 stroke, 2.5" offset, for inner edge of zone 2.
Now, for how long do I do these strokes? Well, I want to go from delta of 2 to delta of 18 between zones 3&$. Now, my previous work of 10 minutes created an overall delta of 49 from an overall delta of 10. That's a change of 39 for TEN minutes, so half that change would be FIVE minutes. However, says Gordon, work on inner zones is about TWICE as efficient as work on outer zones; so discount that time by 50% to 2.5 minutes.
1:30AM:Pressed 10 min, 20 lb weight. After 2.5 minutes of the 3-1-1 strategy, resulting Foucaultgram and Ronchigram are shown. Numbers for this session, the desired parabola, and the zone radii are:
	herb 					parabola	zone radius
252	-					-		1.789
255	+03					+22		2.5
285	+30					+18		3.1
289	+04					+18		3.5
306	+17	delta +54			+18		4.0
min to max		+54
Did not do MUCH more damage but no good. Two areas need work. The center zones 1 is flat - but Gordon says "we can work on that later." More critical is the need to work zone THREE (and inward) to deepen that zone, so the delta from zone 3 to zone 4 will go from +4 (previously at +2) to the parabolic +18.
What do I need to consider? From discussion with Gordon:
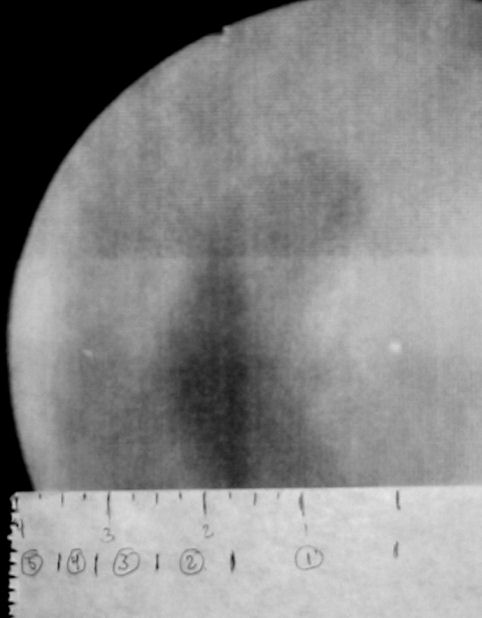
1) I did not make it much worse.
2) Need to work zone 3, can resolve center later.
3) Zone 3 goes form 2.5" inside to 3.1" outside.
4) Typically, I'm changing zone ROC by about 2 mill measured per minute of work.
Therefore, I need to work zone 3 for about 8 or 9 minutes to get that delta from 3 to 18.
To affirm this is the zone to work, look at this Foucaultgram with a scale for radius and zones.. See how the shadow of the deeper curve on the inside 1/3 of the mirror ends at about 2-1/2" out from the center - right at the inside edge of zone 3. The outside of zone 3 is at 3.1" - so that's the range I need to work. (For a sanity check, see the brigher zone at the far edge of the mirror, about 3.5" out - that corresponds to the +17 measurement between zones 4 and 5 with a zone border at 3.5".)
I showed the above to Gordon by email. Here's his suggestions from his June 21st reply.
"You need to work Z3. If you lower Z3, it will make the delta between Z3 and Z4 (currently 4) get bigger, and the delta between Z2 and Z3 (currently 30) get smaller."
"This is one situation where you might want to consider working with the tool on top, as your last session or two with MOT didn't turn out so well. You can put the tool on top, and use slight edge pressure to directly work the area in question. - Gordon"
Aug 21st:Due to summer's heat and other issues, there was a two month's delay since I last worked on the mirror. So Gordon and I discussed it again from scratch. I'll describe that discussion another time. But as with the discussion after my June 19th session the prescription was to do some work on zone 3, at 1" offset; and some work on zone 1, at 2.5" offset.
After microfaceting with the brass brush and warm pressing, I did this strategy for 6 minutes: 2 strokes at 1" offset, 2 strokes at 2.5" offset, 2 at 2.5 and 2 at 1 again. I did this with light pressure on the first three minutes, to get used to the stroke; and more pressure on the last three minutes. Took four turns around the table.
9PM:Resulting Foucaultgram and Ronchigram are shown. Numbers for this session were:
182	-
190	+08
222	+32
233	+11
247	+14	delta +65
min to max		+65
The Ronchigram suggests a start at a turned down edge; also that Zone 3 looked a little "flat". But the delta from 2 to 3 is getting slightly worse (30 to 32, when 22 is desired). Consequently, need MUCH more work on zone 3 but I also need to bring down the central three zones. Gordon prescribed two kinds of center-over-center stroke. That is, from front to back, over the centers and not offset to left and right. Prescription: first, to bring down Zone three, do HALF of a C-O-C stroke with offsets between 1.8" and 1.0"; second, to bring down the inner zones, do a FULL C-O-C stroke with offset from 1.8" in front, through to zero and offset behind of 1.8". The half-stroke would be done three times, the full stroke once. Do that for five minutes, see the results. Then review the TIME and the 3:1 ratio accordingly.
12:30AM:Warm pressed, then did the above stroke for five minutes, four times around the table. Resulting Foucaultgram and Ronchigram are shown. Numbers for this session were:
206	-
208	+02
235	+27
249	+14
265	+16	delta +59
min to max		+59
Results: deltas between zones 5 and 4 and 3 are increasing, delta for 3&2 dropping, both good directions. Seems reasonable to repeat this pattern and monitor results. Then, work on getting zones 1 & 2 down.
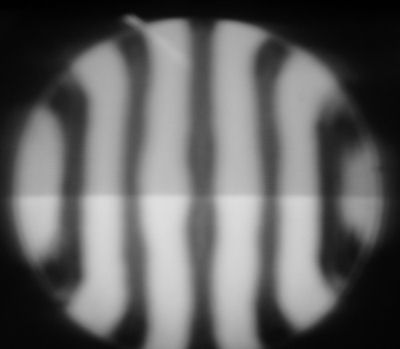
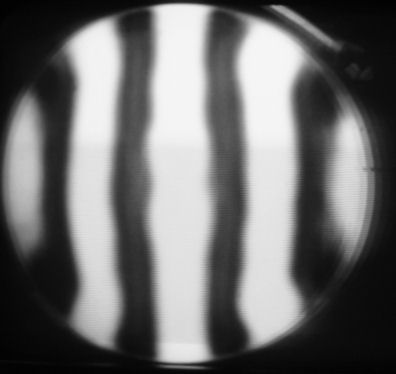
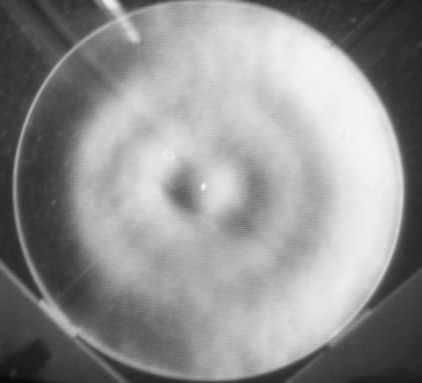
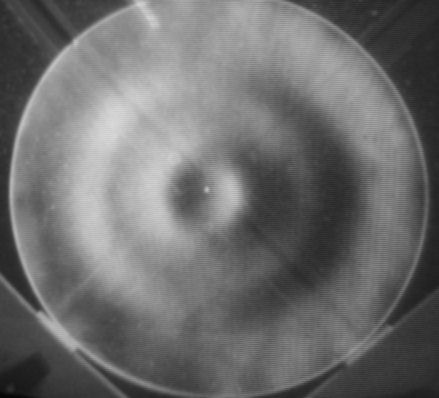
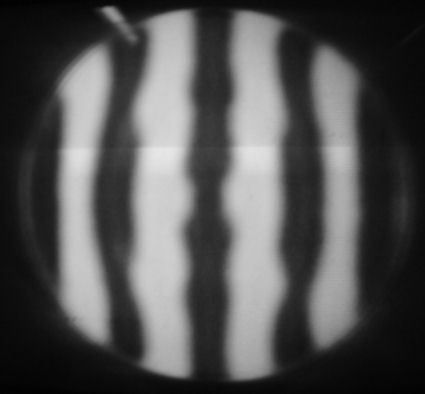
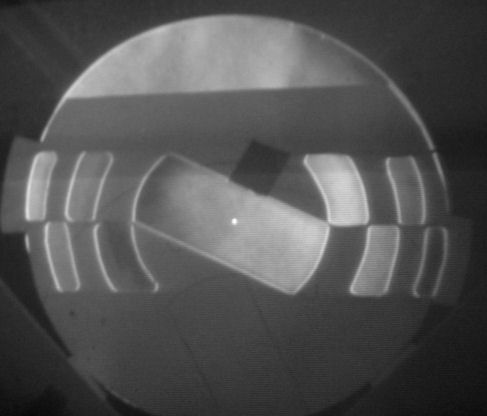
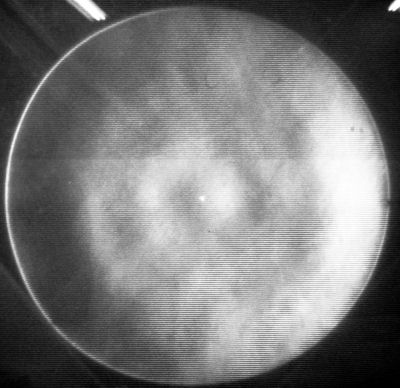
Incidently, here's a masked version of that Foucaultgram. Which zone do you think is being measured? That is, which pair of zones seem to be closest to equal brightness? Remember zones are counted from 1 at the center. For more discussion of this, check Reading the Couder mask in the Footnotes.
Other notes appear on my Web page from my prior work on this mirror.
Here is how Gordon prepared mirror and tool for figuring work, in April 2006.
a) Clean the tool under tap. Brass brush the tool in COLD water under tap, tool flat supported above bottom of sink. (An early version of this process also included slashing an X into each pitch facet with a single edge razor blade. If you do this, brass brush afterward to remove chips of pitch.) Don't brass brush (or slash) in WARM water, the grooves won't be as well defined.
b) Then run warm water to heat it up for under a minute, rotating the tool so no part is under the tap very long. Put in pan of warm water. Give time for pitch to get soft to your fingernail, checking along the edge between the facets. DOn't touch the facets!
c) Coat with 1 micron Cerox. Press for 5 minutes with 20 lbs weight. Then remove weight and let cool 6 minutes.
d) Before starting the session, breaking the lap free by hand it should stick to the mirror. Force it off slowly about an inch to one side and move around without pressure until it stops sticking.
I got into trouble in my earlier figuring sessions, because I've neglected doing some of these steps between tests. I also had trouble because of the .1 micron Cerox I used. Check my prior work for details.
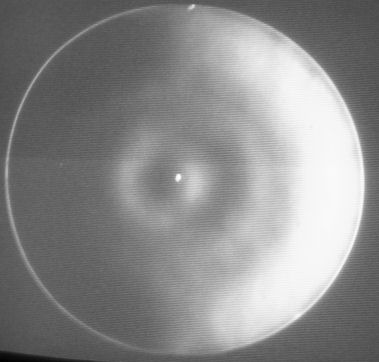
(A work in progress as of 7/10/06) There are other documents which describe the Foucault test using a mask on the mirror to only show pairs of zones of equal area. Couder is best known for this test but others developed similar tests. Here's the advice I received from Gordon Waite as to how to read the Couder mask shadows. In general, the concept is to look for EQUAL SHADING for each pair of zones in the mask. The position of the tester's knife-edge reveals equal shading of a zone, when the edge is at the radius of curvature (ROC) for that zone.
Here's an image of the masked version of a Foucaultgram. Which zone do you think is being measured? That is, which pair of zones seem to be closest to equal brightness? Remember zones are counted from 1 at the center. The values for this mirror are at this link
Gordon's tester has two adjustments. One is the standard adjustment in position toward or away from the mirror; that's how you establish the ROC, set the number of Ronchi bars, etc. The other adjustment moves the knife edge left or right of the point of converging rays; with the knife edge to the RIGHT of that point. On Gordon's tester, the platform holding the knifeedge and the light source is tilted by this adjustment with a threaded shaft; turning the knob clockwise will RAISE the right side (from the back) and tilt the platform counterclockwise. This tweakes the edge which is on the right INTO the convergent point. (Hope I have that right!)
1) Start at the center zone. The center is hardest to read because the surface may vary a lot, or it may be flat; and it's the widest zone. Look at those parts of the zone complimentary to either side of center, not the entire zone, if you have a raised or lowered "bellybutton" within the zone. (I"m least sure as to how to read the center.) Record the ROC for the center.
2) Proceed to the second zone just outside the center. Find the approximate location where you see similar shading for either part of zone 2. Then, adjust the knife edge so that the knife BARELY cuts into the focus; the mirror should be mostly dark. (Most testers have a fine adjustment for moving the knife edge to the left or right of the ROC.) Then lightly tap the tester, or the table the tester is resting on. What you want is to see a flash with each tap, as the knife edge briefly interrupts the point of focus.
3) Now, FINE adjust the knife edge in distance from the mirror, and tap again. You are looking for a flash of EQUAL INTENSITY from both areas of the zone as masked, while you are looking approximately at the CENTER of the mask. (Some people instruct that you flick your eyes between the two unmasked areas. The eye is better at measuring changes than absolute brightness. But this method of flashing eliminates the need to flick your eyes.) Record that ROC distance.
4) Repeat items 2 and 3 for each zone outward. It's good practice to go back to the center and read another set; try not to remember your previous readings. You can average the two sets.
Over time, you'll learn what your range of error is. Multiple measurements of the same mirror will suggest an error something like several thousands of an inch (mills). Many Couder programs will provide you a way to include that error in your testing.
During my April 24th spherizing sessions, I asked Gordon about the stroke strategy. He made numerous suggestions. "Look at the ends of the Ronchi bars", he said. "Where they bend from the straight is where the zone begins [from the edge]. That suggests the length of the short stroke needed to fix it. But you have to be careful: the bad thing they do is that they leave ring zones on the mirror if you use short strokes for too long, or with too much pressure."
"So use SOME short strokes, with a lot of pressure, but do that stroke alternately with the other kinds of strokes you need." He described doing for instance a minute of long strokes, a minute of short; a minute of long strokes, a minute of W-strokes; and so on as alternate sets. "For instance, you need long strokes to plane down the center. All these different strokes don't hurt each other, they help but in different ways." Doing them as sets rather than randomly, said Gordon, is a way of controlling and monitoring your results.
He also commented on how light pressure creates surface roughness, as the pitch just skips over the surface and so polishes it intermittantly. My surface was improved recently due to my use of more pressure, at Gordon's suggestion. When my arms were hurting from the additional work, he said "that's a good sign".
Another way to interpret the masked Foucault data, said Gordon, was to look at zone-to-zone changes over each run. For instance, the third and fifth zone differences had gone from +44 to +54 to +51; I was not damaging the figure of the outer 50% area. Also, the overall delta from center to edge zones was shrinking from 55 to 43 to 19; of course at a sphere it will be zero.
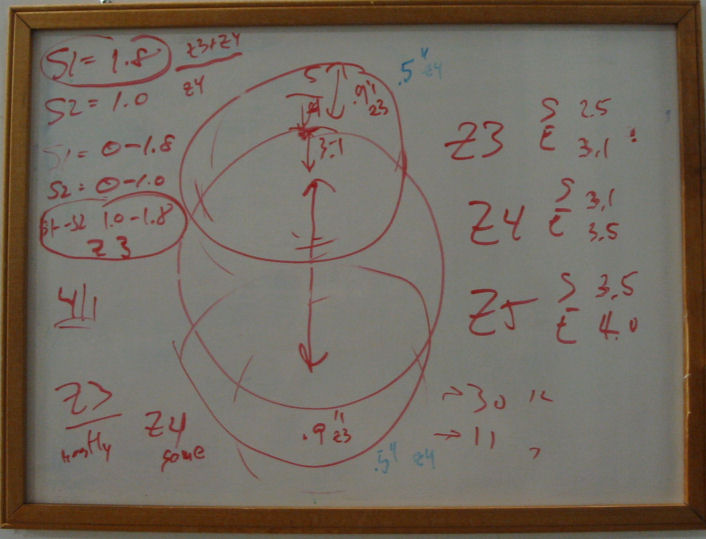
Let's review the mirror as of June 12th, and see what the stroke "prescription" should be and why. (Gordon will respond with his own comments about what I did in the next section.) The mirror specifications are: 8" mirror, f/5.5 or ROC 89.5". Zones radii 1.789, 2.530, 3.098, 3.578, 4.0. The numbers and shadowgrams were:
radius zone    delta
1    1.789  140?    -    (note: center too bumpy to be exact)
2    2.530  158    +18
3    3.098  114    -44
4    3.578  099    -15
5    4.000  101    +02
     delta              -39
     min to max         59
This is a mirror with two ringed zones, OK surface, and relatively flat outer edge. The Ronchigram also shows the zones.
Here's Gordon's analysis. From Zone 3 to 4 and from 4 to 5 (the outer zones) their overall delta is -13, so that's reasonable flat. But from Zone 2 to 3, and from Zone 2 to 4, the change is extreme. So the plan is to work zone 3 and zone 2, which have a total delta of 59, to reduce that change. To do so we need to offset the mirror over the tool, so in effect the tool edge can "work" only those zones.
Gordon marked the mirror with tape at 1-3/4" and 3" from center, the extreme boundaries of zones 2 and 3. The plan was to work the mirror offset from the right, over the tool, with some pattern of strokes to work within those two zones.
Consider the mirror over the tool, mirror out to the right, centers of tool and mirror aligned horizontally. Start with the tool edge touching the outer edge of mirror zone 3 - that would be an offset of 4-3 = 1 inch edge to edge. The maximum you specified to move the mirror forward (or backward), tangent to the horizontal line between mirror and tool centers, was 3/4 inch from center forward (or backward) to the edge. So that defines the stoke length, up to 3/4" of either edge.
After strokes on the outside of zone 3, then move the mirror horizontally to the right, the tool edge halfway between the boundaries of mirror zone 3 and 2, at about 1.5 inches from edge to edge. Similar strokes forward and back up to 3/4" from center of mirror to tool edge.
Then move the mirror further to the right, the tool edge to the inner edge of zone 2 as marked, or an offset of 4 - 1.75 = 2.25 inches edge-to-edge. Again stroke forward and back to 3/4" of center of mirror to tool edge.
The net pattern is to stroke the mirror with the tool edge on the mirror zone closest to the MIRROR edge at zone 3, to the tool edge on the mirror zone closest to the mirror center at zone 2. You are working within zones 2 and 3 as the mirror moves rightward.
That's half the pattern. To complete the set of strokes at that station, reverse and repeat that set of strokes. With the mirror edge furthest to the right, repeat the strokes for that zone, the inside of zone 2. Then move the mirror to the LEFT to repeat the strokes for the boundary of zone 2 and 3. Then move the mirror LEFT again, and repeat the strokes for the outer edge of zone 3.
Here's how to start the next set of strokes. Remember, the tool is on the bottom, mirror on top. At the end of the last stroke, mirror center is at the "bottom" edge of the tool, with that center at the 1-inch offset. Step counter-clockwise (to the right) around the table, and twist the mirror clockwise as you do so. Move that mirror center to the next point counter-clockwise around the tool. Then do the stroke pattern again.
Ultimately you will complete one or more COMPLETE rotations of the MIRROR as you move around the tool underneath it, as Gordon discusses in his later comments. This is preferred to avoid astigmatism from only working one part of the mirror. (In my intial comments, I focused on rotations around the stationary tool, not the mirror; Gordon addresses that error.)
As for how MANY strokes: Gordon said an inner zone of the mirror will get worked more than an outer zone, for the same number of strokes with the tool edge over each of both zones. So he determined to do THREE strokes when working the outside of mirror zone 3 (when the mirror is least offset over the tool; TWO strokes when working between zone 2 and 3; and ONE stroke when working in zone 2 (when the mirror is most offset). Again, the mirror is moving to the right between sets of strokes. And then reverse, with the same ONE, TWO, THREE strokes respectively at each location, moving the mirror to the left, bringing the mirror back out to minimum offset again. So the pattern is 3-2-1 to the right, 1-2-3 to the left. All with light pressure, not the heavy pressure used with the full 1/3 COC stroke. Pressure is less important than control and SMOOTHNESS.
Consequently, the outer zone gets 3+3=6 strokes at the outer zone 3 from the tool edge; but it does not "see" the additional strokes of the inner zones. Meanwhile, the inner zone gets 1+1=2 strokes at the tool edge, but it also sees the non-edge work from the other 3+2+2+3=10 strokes. The middle between the two zones gets a middle portion of work; 2+2=4 edge strokes plus some of the non-edge work from the 1+2=2 innermost strokes.
The next question: how much TIME to take for this set of strokes? Prior work suggested that 1) I could remove 1 thou of ROC per minute with COC under pressure. But consider that 2) offset strokes do 2 or 3 TIMES as much removal as center-over-center strokes. So it was likely I'd need to do 20 minutes to remove about 60 thou of glass. As a sanity check, I should stop and monitor my work at several minute intervals. A reinforcing consideration is that a mirror gets too hot, or Cerox gets dry, if a mirror is worked much longer than several minutes.
I did the stroke pattern under Gordon's guidance. It took several minutes to get the stroke right,for my first session of several minutes. Then I did about 8 "good" minutes. Here are the numbers, from this section of my notes
100    -
093    -07
072    -21
056    -14
061    +05    delta -39
min to max         44
Note my zone 2&3 delta went from 59 to 28 - good progress!
Then I did several more minutes of the same, and here are THOSE numbers:
171    -    (center MUCH better!)
177    +06
163    -14
151    -12
154    +03    delta -17
min to max         26
Zone 2&3 delta went from 59 to 28 to 20 - more progress is good! And the outer zones maintained approximately, which was our intention. And both delta and min-max are reduced - of course our goal for a sphere is zero. Resulting enhanced Foucaultgram and Ronchigram are shown. Gordon said: "Still oblate but smoother and less zony. 1/2.3 sphere or 1/4.9 parabola. Continue the pattern for several minutes, but on a 3-2-0-2-3 or even 4-2-0-2-4". Eliminating the stroke at the maximum overhang accomodates the fact that it's now zone 3, not 2, which needs the most work.
After reviewing my description, Gordon explained in an email his basis for the corrective work. - Herb
One important point about the general process of this kind of corrective work.
The important point is to say to yourself:
1. Where do I need to work on the glass?
2. What kind of stroke would be effective?
3. After executing the stroke, test the mirror.
4. If the result wasn't totally correct, WHAT DID YOU DO WRONG?
When you're making "parabolizing" strokes, the length of the strokes is a challenge to determine and execute properly. I think of it like this. I draw a circle around the bottom piece that is about 3/4" in from the edge. When you execute a parabolizing stroke, the center of the top piece should go right up to that imaginary circle, but not cross it. If you cross it, the top piece will become unbalanced and may tip over the edge, with obvious disasterous consequences. If your stroke doesn't make it out to the full length, you will be under-working the central part of the mirror.
Note that there could be situations where you WANT to underwork the center and then it would be right to make shorter strokes.
Also, a note on the "3/2/1" strategy. A 1" wide ring on the outer edge of the mirror has a much larger surface area than a 1" wide ring on the inside of the mirror. So a stroke on an outer zone doesn't remove as much glass as a stroke on an inner zone. Thus I often use a strategy like "3/2/1" to even up the amount of work when I am trying to effect a wide part of the mirror. If the stroke was "1/1/1" the inner zones of the stroke would get far more effective work than the outer zones. The "3/2/1" evens that up. This is very flexible, and you can use this idea to target very specific areas on your mirror. After looking at the results of "3/2/1" we saw that we still needed more work on Z3 and less on Z1, and thus the recommendation of the "4/2/0". Ha ha, it's now just "4/2" with no more work needed on the inside zones. (That's not strictly true, of course. Working "4/2" over Z3 and Z2 will also work Z1, just not as much. Which is what your mirror needs.)
Also, be careful when talking about the strokes when using "inside" and "outside" because it is very confusing. With TOT, when you move the lap "outside" you are working the "inside" zones on the mirror. This can be very confusing for people.
Another slightly altered version of "3/2/1" goes like this. Say I need to work two adjacent zones, but the inside zone (2 for example) needs more work than the outer zone (3 for example.) I'll often take two strokes over Z2, then two strokes over Z3, then take another two strokes over Z2. That puts more work on Z2. This gets a little subtle. People are used to making "W" strokes, and depending on how you "W" you can end up putting extra work into zones that you never intended. Of course when you learn to see the subtle difference, it becomes a powerful tool instead of yet another way that your mirror goes wrong!
(Testing was not in Gordon's email, but he discusses some of it in these notes on stroke strategy.)
For example, in your sessions, you made good progress in Z1 and Z2, but not enough in Z3. You need to ask WHY? We talked about the answer. When you were making your strokes, when you would "come back" through for the second "3" stroke, you would often overshoot the limit, and end up working with edges tangent instead of with a 1" overhang. That would move the correction out to the outer zones instead of putting it in Z3 where you intended. Zones are very narrow on the outside, so missing your stroke target by 1/2" puts it in the next zone out, and missing it by 1" puts it two zones out. Also, I kept noticing that you weren't getting the "3" stroke all the way out to my imaginary circle on the push stroke. Thus the center of the mirror got a little less action that you would expect.
Finally, you made some mention about going around the polishing stand and making sure you come back to the same place you started. This is ONLY important if you are working with the mirror on the BOTTOM, which you seldom do with an 8" mirror. And it's ONLY important when you are in the very final part of figuring. The point then is to avoid astigmatism. If you need only a very short session and you go around 1.5 times, then you have deposited twice as much work on one side of the mirror as on the other side, thus leading to astigmatism.
BUT!!!! If you are working MOT, this rule doesn't apply. The mirror is now rotating IN YOUR HANDS and the amount you walk around the barrel is not important. What IS important is that the mirror makes a complete rotation in your hands. This is very tough to do without some kind of mark on the mirror. You start with the mark under your right index finger, for example, and you end the stroke after a certain amount of time, and when that mark is again under your right index finger. Thus you have worked all diameters of the mirror equally. Full revolutions around the barrel are good for the bottom piece. Full rotations in your hands are good for the top piece. MOT versus TOT makes the difference in this kind of though. (P.S. if you are working TOT, make sure to rotate the mirror on the stand once in a while to randomize your starting point! Again, you seldom work TOT with an 8" mirror.)
Hope this makes some sense, Herb! Good luck! - Gordon
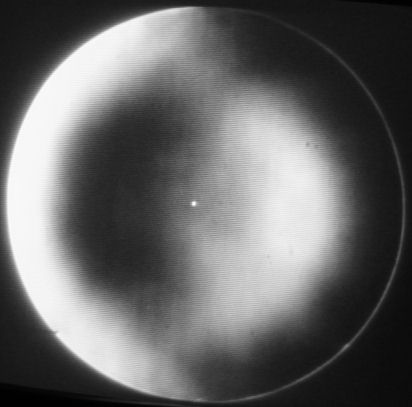
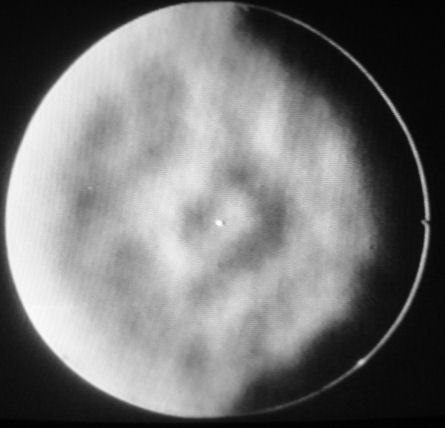
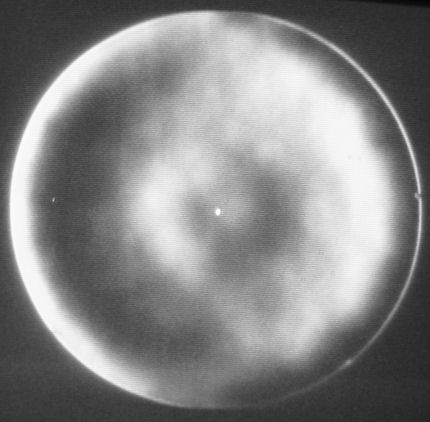
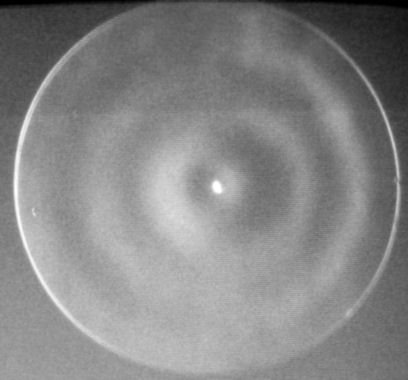
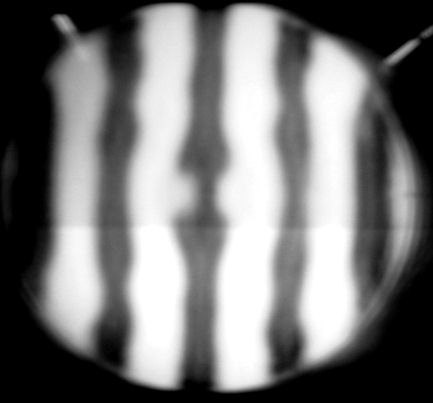
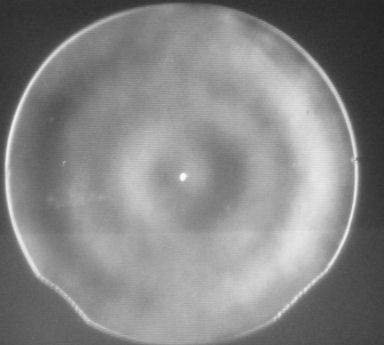
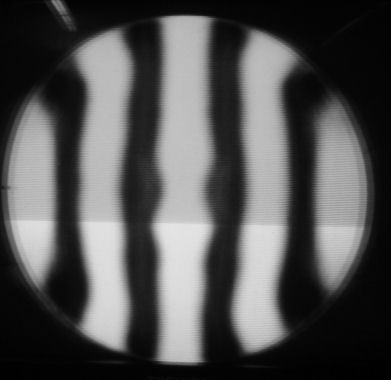
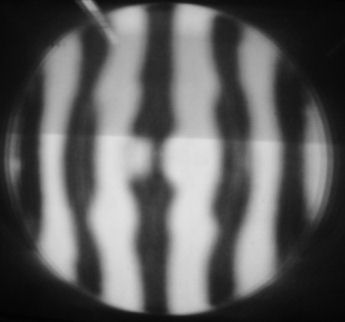
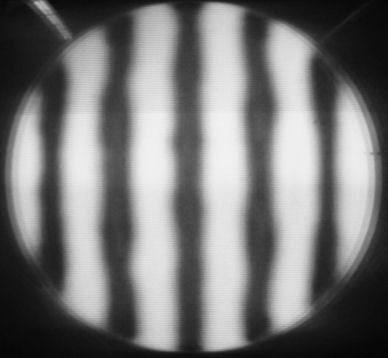
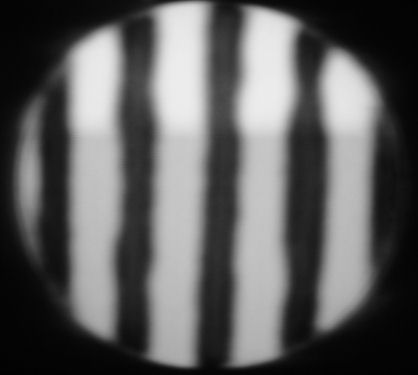
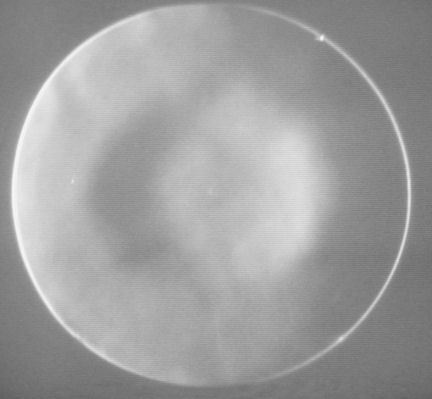
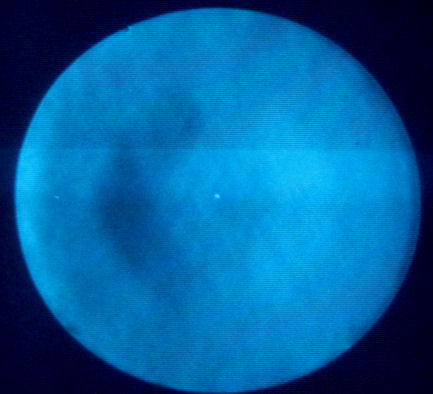
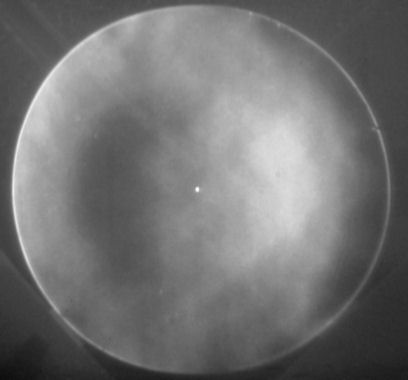
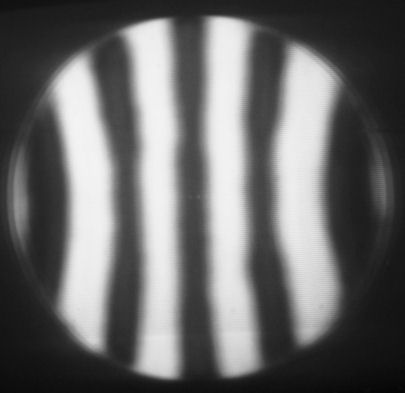
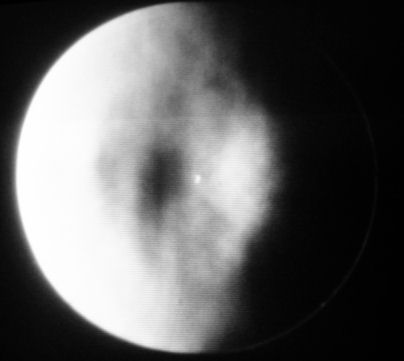
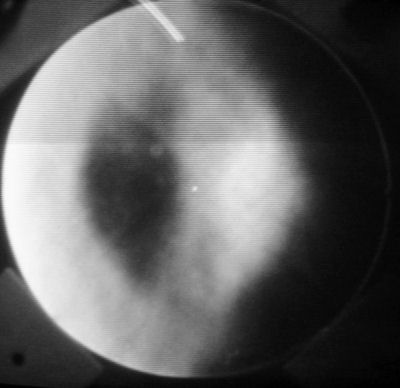
In the figuring process, there is an issue of surface roughness. In the following Foucaultgrams, ignore the X-like diagonal features radiating out from the center: that's from the surface behind the mirror. Here is a surface Foucaultgram from Mar 27th as I start to get near the desired figure. Note the edge of the shadow on the right: it's lumpy not a smooth edge. That indicates large-scale surface irregularities, often called "dog bisquit". By 1AM later that evening, after some work (but not very good work) here is the resulting surface Foucaultgram, with a similar shadow line. What is not visible on these images are apparent linear patterns, consequences of a limited number of strokes or a narrow range of variation of stroke. For instance, in this earlier Foucaultgram you can see zoning from a session of too-rigidly-identical stokes of pitch polishing.
Lines and surface variations are reduced by a combination of slower strokes, slower "walking" around the table as you stroke, and careful variation of stroke and mirror. Gordon has watched me at work, and made numerous suggestions about my technique. For instance, he showed me how to both walk around the table in small steps AND stroke AND rotate the mirror, all at the same time. It's important, he noted, not to stand at widely-spaced or fixed places around the table - that leads to patterns and that irregular, "dog bisquit" surface.
A finer surface irregularity is called "microripple". I'll discuss that as I work on it.
Herb Johnson
Contact information:
Copyright © 2006 Herb Johnson